What to Do If You Have to Hold the Button Down for Your Garage Door to Move
-
June 19, 2025
-
Gracen Zucha
There’s something strangely annoying about having to hold down your garage door button or remote just to get it to open.
One moment you’re ready to pull in and relax, and the next you’re trapped in a weird holding pattern.
It’s not just frustrating—it could be a warning sign that your garage door needs repairs.
At Welborn Garage, we’ve fixed this exact problem dozens of times. Garage doors are heavy. If they need constant pressure to work, that indicates a deeper issue.
Let’s explore why this happens, how to troubleshoot it safely at home, and when it’s time to call an expert.
Why You Shouldn’t Have to Hold the Button
Your garage door opener is made to receive a quick “press” command to start and another to stop. Holding the button down isn’t normal.
That behavior usually means the opener is stuck in manual mode or sensing interference—or that safety sensors aren’t behaving right.
Why it matters:
- Safety Risks: Recalculating the path while you hold could lead to unexpected stops or reversals.
- Wear & Tear: The opener puts extra strain on components when it’s held open or closed.
- Inconvenience: It just shouldn’t work this way.
Common Reasons You Have to Hold the Button
Here are a few usual suspects:
Unaligned or Dirty Safety Sensors
- Symptoms: Requires holding the button; door reverses or stops.
- Why it happens: The sensors at the bottom of each side sense a blockage—even if one is just out of place.
- Fix: Clean the lenses and realign them so green lights are solid.
Opener’s Limit Switch Malfunction
- What it is: The opener uses limit switches to know when to start and stop.
- Problem: If they’re out of adjustment, the opener stops mid-cycle.
- Fix: Adjust the “down” limit screw or dial on the opener motor (see your manual for specifics).
Track or Roller Issues
- What to look for: Dirt buildup, dents, worn-out rollers.
- Effect: The opener struggles to close the door fully, so holding the button sustains power.
- Fix: Clean tracks and tighten brackets..
Force Settings Too Low
- What it controls: How much “force” the opener uses.
- Problem: If set too low, the opener stops when it “thinks” it hit something.
- Fix: Adjust upward—little by little—until the door closes all the way and stops cleanly.
Dragging Door or Broken Springs
- Symptoms: Door feels heavy, jerky or slow.
- Dangerous: Worn or broken springs can fail dramatically.
- Fix: This is a tech-only job. Look for broken spring replacements and safety cables.
Faulty Wiring or Control Board
- What can go wrong: Loose connections or controller glitches.
- Symptom: Opener fails to receive a solid command without holding the button.
- Fix: Inspect wires; if the circuit board is old or damaged, it might need replacing.
Troubleshooting Guide: Step-by-Step
Here’s how to fix it piece by piece:
Step 1 – Clean and Align the Sensors
- Wipe the lenses with a soft cloth.
- Check that both sensor lights are on and steady.
- Gently move each sensor until the lights are solid.
- Test the door—does a quick press work now?
- Fix: Inspect wires; if the circuit board is old or damaged
Step 2 – Check Limit Switches
- Refer to your opener’s manual for “limit adjustment.”
- Locate the “down” setting (usually dial or screw).
- Turn it in small increments, test after each.
- Goal: Door closes fully on single press.
Step 3 – Inspect Tracks & Rollers
- Look for dirt, grime, or damage.
- Use a soft brush to clean and a cloth to remove debris.
- Tighten loose bolts.
- Check for cracked rollers—nylon ones are great for quiet operation.
Step 4 – Adjust Force Settings
- Find the “force” dial on the opener unit.
- Increase force gradually—about 1/4 turn at a time.
- Test the door after each adjustment.
- You want smooth action without collapsing on anything solid.
Step 5 – Test Springs and Balance
- Disengage opener with the emergency cord.
- Lift the door halfway—if it moves slowly or is heavy, your springs aren’t supporting weight.
- Leave spring work to pros—they’re under high tension.
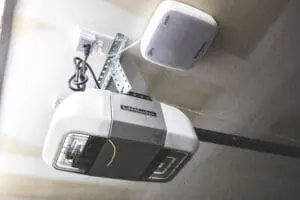
Step 6 – Inspect Wiring and Board
- Unplug the unit first—safety first!
- Check for loose or damaged wires.
- Tighten connections or replace damaged wiring.
- If board looks burnt or old, call a technician.
DIY Tips vs. When to Call Welborn
Here’s a helpful table so you know when to DIY and when to phone a garage-door pro:
Why It Matters—Beyond a Quick Fix
You might think, “I’ll just hold the button. No big deal.” But here’s why it’s more serious:
- Safety Risks: Sensors determine if someone or something is in the door’s path. If malfunctions continue, the door might close on vehicles or objects.
- Wear and Tear: Running against misaligned parts wears down rollers, tracks, and springs fast.
- Security Concerns: A door stuck half-open invites weather, pests, or even intruders.
- Emergency Delays: Remote releases may fail, leaving you needing a ladder or extra help at inconvenient times.
Keep It Operating Smoothly With These Preventative Tips
Staying ahead of issues helps you avoid the “hold-button” struggle in the first place:
- Clean and realign sensors twice a year.
- Lubricate rollers, hinges, and tracks with garage-safe lubricant.
- Tighten loose bolts and nuts during each maintenance check.
- Test spring balance and opener force settings every few months.
- Check for worn rollers every few months.
- Upgrade to belt-drive opener for smoother, quieter gear.
Call Welborn Garage When You Want It Done Right
If your garage door still needs a manual button hold after all this, or you’re not comfortable testing springs or controls—don’t risk it. Call the local professionals who care.
At Welborn Garage, we offer:
- Same-day diagnosis & repair
- Clear pricing upfront—no surprise fees
- Expert technicians who treat your garage like it’s their own
- Safety-focused fixes—we know how dangerous spring work can be
Related Blogs